Sail Control: Hoisting and Downhaul
Home Page
index for rigging
Sail Control: Outhaul and Inhaul
Sailing Programme
TT Results Table
Tactics and Rules
The Boat
Sailing Catapult
RAISING THE SAIL
|
Pulling up the sail and locking it should work easily and
predictably, so if not, there is a problem
which is able to be sorted (and on which you can get advice.) (See photo right, of team help in action at Bala.) The halyard pulling up the sail has a “locking” mechanism attached to the head of the sail (a stainless-steel loop on the sail which rides up over a small strut at the masthead, see details below.) A key point is that the mast and sail should be in line when the final pull to the top is made. Hoisting is helped by a silicone spray on the boltrope e.g Halfords Silicone Lubricant for rubber and plastic A second line runs up inside the luff groove alongside the halyard, which is pulled to release the loop. These are pictured below. The halyard and the release are usually supplied as one continuous cord, knotted in the fitting, but they have quite separate functions. Since the release line is given a single tug with a lighter load (below) any replacement can be a lighter line, (and usefully they are then easily distinguished untangling or looking up the mast.) |
 (If there is any persisting problem getting the "lock" to work easily, it is well worth testing with the mast and sail laid out on the ground, with one person "hoisting" at the foot, and another watching the lock at the head to see where the problem is.) |
|
1
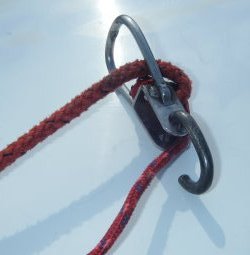 |
The two lines run forward towards the mast from
behind the halyard fitting (photo left) which is not the way you would
immediately think of it As shown, the halyard (the upper cord) runs through the ring, so that it is above the pivot point on the fitting (where the hook or shackle attaches to the loop) and the release cord (the lighter line in this case) runs under this fulcrum. (On this boat, the usual shackle has been replaced by a tight-fitting hook for speed. After this photo was taken, a short length of tube was added around the "axle" of the hook, as a roller, which usefully increased leverage, and reduced friction, to strengthen the pull.) |
The halyard pulls the loop up above the strut on the mast, and forwards over it, held fixed in place when the sail foot is then pulled down and tightened. (see sequence of photos below)
 |
 |
As shown, the release line must be slack when
the halyard pulls the loop over (as otherwise it would pull it
backwards) and this is set by ensuring the release line has some
slack where it is tied at its lower end to the halyard.
To release the loop, the release line
(lighter line in this boat) is pulled (assisted by pushing up at the foot) and this
pulls the loop up and back (photo below right) so that the sail comes down
when pulled at the foot.
 |
 |
At the foot of the mast,
the halyard turns around a pin to be pulled (usually by standing at the
back of the boat after the first one or two feet, pulling in line with the mast.)
This can easily have a roller or a sheave added for an easier and more powerful
pull. Alastair
successively added to the diameter of the roller, and then cannibalised
a ball bearing block (with balls jumping around the garage at times) to
give free running.
ALTERNATIVES:
Although as above the locking mechanism should work smoothly and
predictably, where problems do occur, some helms have found resolving
the problems frustrating (and they occur in the final stages on shore
before the start, not a good time.)
Syd Gage details the single-line alternative
here
Alternatively, the advent of
non-stretch Dyneema raises the possibility of ceasing to use any
mast-head lock, and simply cleating the halyard off at the foot of the
mast. This doubles the compression force on the mast, but this should
not be a problem.
 |
THE
DOWNHAUL |
 |
Back
to top
Home Page
Index
for rigging
Sail Control:
Outhaul and Inhaul