|
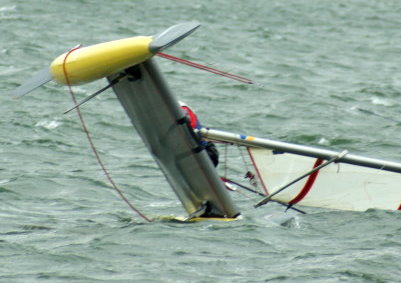
Catapult will race easily enough in Force 6, and survive in Force 7,
staying out until all the fleets are brought in, but can be overwhelmed, as
Stuart demonstrates (below right) at Bassenthwaite in 2011, caught by a 40 mph gust
on the run
From the
designer of Catapult, Jon Montgomery:
It goes without saying that the quicker you can
recover a capsize, the less chance you have of the boat completely
inverting. Knowing what to do is really important, as well as practicing
at least once per season.
Catapult’s unique system simplifies capsize
recovery but needs to be set up with care. Three things are important;
Mast buoyancy
Mast heel control line tension and rigging set up
Capsize recovery technique |
 |
CAPSIZE RECOVERY
TECHNIQUE
 |
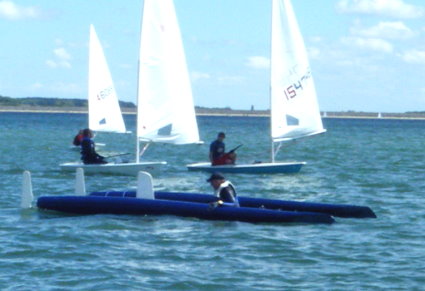
Partial
capsize – one hull still clear of
water
In
many cases the boat will not completely invert
(as Chris shows cheerfully, left,
sitting in Bassenthwaite Lake, 2011, Stuart also over
behind him.)
The first step is to release the control line from the cleat on the high
hull, and then lengthen the shroud to this hull so that the hull
moves from overhanging to lying back.
This means shortening the shroud to the hull in the water until the
blocks are close or touching.
(Debates over where the shroud control line should run across the boat
are around being able to pull in the shroud on the in-water
side: more here.) |
Jon's
preferred technique is to steady your foot against the front cross beam
bracket whilst floating in the water.
"This gives you some purchase to
enable the mast heel lines to be un-cleated. Firmly hold the
mast heel line close to where it exits the triple block, so when
releasing the line from the cleats you have full control.
Pull the control line until the triple blocks nearest to
you in the water meet, then the mast should be fully to one side of the
boat."
George below left (at Rutland in Force 7 gusts) has achieved
this, and (below left) is climbing the slope of the trampoline.
Jon preferred to stand on the hull just forward of
the front cross beam and gently pull the boat back upright, just
by leaning a little inboard.
 |
 |
|
As the boat begins to
right itself you can lie on the front cross beam or the middle
of the trampoline to stop the
boat flipping back over. (As shown (above right) as George
successfully brings the mast and sail up; this time it will be
to windward, and it gybed violently as the hull came down to the
water---but this was absorbed with weight in the middle of the
boat, even with the rig canted.)
As Jon
comments. "All that’s left to do
then is adjust the mast heel lines to centre the mast, figure
out which way the next mark is, then continue sailing!"
|
|
COMPLETE INVERSION
"If
the boat turns completely mast down, it is still possible to recover the
capsize. Swim to the triple blocks on either side of the boat. Pull the
mast heel control lines to shorten the triple block nearest to you. Mast
buoyancy will start to lift the hull nearest to you – but it will take a
little time for the water to drain from the hull beam.
Be
patient and if you have sufficient personal buoyancy to enable
you to help lift, so much the better.
Once the hull is airborne, it is necessary to move the mast heel control
lines fully through the system, so the mast is canted to the
other side of the boat. The helm can then climb onto the hull
and use weight to right the boat, as described earlier.
Safety note
– With an inverted mast and a lumpy sea, the mast ball can be
jerked out of its seating. It is therefore important to tie the
mast to the cross beam."
(Right: Alastair tries to recall these instructions at Rutland,
2010---in fact the buoyancy on the fully-canted mast did lift
the hull as described above.) |
 |
MAST BUOYANCY
John Montgomery (designer of Catapult) summed this up: The
shock of discovering you have a leaky mast is bad news. The answer is to
make sure you fully invert the mast at the start of the sailing season.
A tremendous amount of water pressure is trying to get past the seals,
so it’s a job to be taken seriously. Testing is
not simple so it may be best to form a plan with other CCA members so
several test at the same time and a rescue boat is around should anyone
get into trouble. Some coaching could also be provided from those who
have done the process before!
The original round masts were sealed with cork. Topper used
Polythene foam. Anodised aluminium doesn’t give sealants much of a
chance to key to the surface and the odd failure has been known.
I think that top mast seals would give trouble first. My plan
would be to strip out old seals and replace with 12mm thick marine ply
interference-fit plugs, with sealant for added security.
(See also Syd Gage's article at
Mast buoyancy and capsize recovery
Below: The aftermath of Alastair’s capsize and
failed righting efforts at (Bewl, April 2015.) He has
had time to think of the lessons, while drifting to shore and getting
safety boat assistance.

Some
lessons from the capsize above are:
-- Prepare the boat fully for
sailing in strong winds. (Alastair had not renewed the “tags” securing the
centreboards in place, and had to flounder around retrieving one,
further delaying recovery.) (He lost his hi-spec woolly hat
as well.)
-- Tie the mast foot tightly down
into the socket; the strong forces with the mast fully canted while
capsized eventually flipped it out.
-- Ensure that the topmast
is fully watertight;
in the slow recovery, the mast leaked, and finished any possibility of
recovery.
--
Know the righting sequence so well that
it can be done quickly when upside down, and in the water.This means
knowing the overall plan, the exact ropes to access, and where they will
be with the boat over or on its side.
MAST HEEL CONTROL LINE
TENSION AND RIGGING SET UP
Jon Montgomery:
Too tight and line doesn’t move easily between the four triple blocks
and two turning blocks and freeing the control line jam cleats can be
tricky. Too loose and line can loop aft and get caught in feet when
tacking which may trigger the cleats to release. This is annoying as the
mast will heel rapidly until one side’s triple blocks meet. Extra slack
and the mast will heel to a dangerous angle and risk the mast ball
levering out of its seating.
The forestay bridle with its block and soft line allows slack
into the system whilst heeling the mast to port or starboard (but notice
that when the mast is heeled towards its maximum, the system tightens up
again). The length between the block stops determines the amount of
introduced slack when heeling the mast and a distance of 480 mm is
recommended.
A good way to assess how much slack you have in your system is to
set the mast upright, with the shrouds cleated as though you were
sailing. The amount of slack in the system can then be measured by
stretching a light line across the deck from cleat to cleat. This gives
a reference point to measure slack in the mast heel control lines.
Measure how far aft the control line stretches. About 550mm aft slack is
about maximum. Remember that a wet line may stretch a bit.
Incidentally, when the mast is heeled to the maximum, the
dimension of the extended triple block should be 1.25m, giving a mast
heel of 40 degrees. You will notice that the top of the mast ball has
around 3mm clearance to the cup – so any additional mast heel will lever
the mast ball out of the cup!
More on the shroud line position, and relevance for capsize recovery at
Repositioning
the mast heel line
and at
Mast heel line setup
Home Page
Back to
top
Cruising
The Boat
Rigging and
Tuning Sailing Catapult
|